How to Create Diamond Texture with HDR in Blender
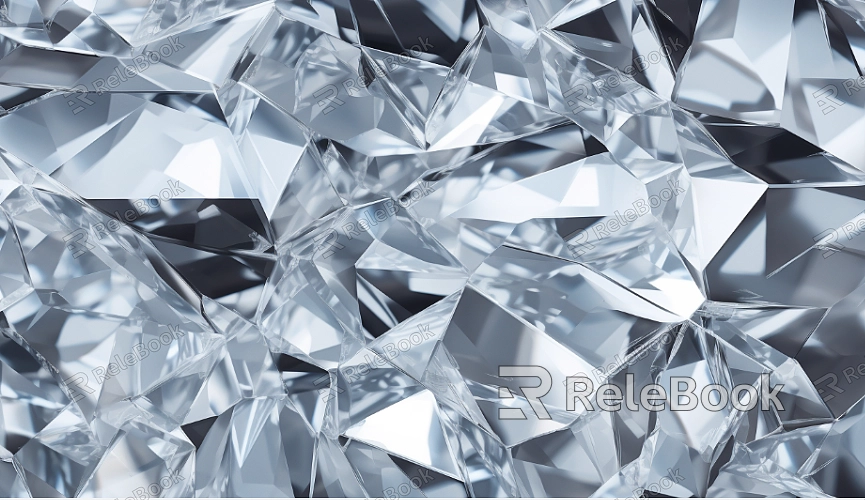
Rendering diamond textures can be a challenging task due to the complex optical properties of diamonds, such as refraction, reflection, and dispersion. These characteristics require advanced techniques to achieve a realistic appearance. One effective method to enhance the realism of diamond textures is by using HDR (High Dynamic Range) images. HDR images allow for a broader range of lighting and reflections, bringing out the sparkle and detail in diamonds. Blender, a powerful open-source 3D software, provides the necessary tools and features to achieve high-quality results. This article will guide you through the process of using HDR to create diamond textures in Blender, covering key steps and best practices.
1. Setting Up HDR Environmental Lighting
In Blender, HDR images are typically used for environmental lighting, which helps create more realistic light reflections within a scene. When crafting diamond textures, HDR images can capture and display intricate light and shadow variations.
Importing HDR Images: Begin by navigating to the “World” settings in Blender and importing your HDR image as the environment light source. This will significantly enhance the dynamic range of the lighting, resulting in more nuanced and detailed light behavior.
Adjusting Exposure and Brightness: Within the “World” settings, you can fine-tune the exposure and brightness of the HDR image to ensure that the diamond’s surface reflects enough light, showcasing its unique optical qualities.
2. Creating the Diamond Material
Setting the correct material parameters for diamonds is crucial, particularly when dealing with optical properties like refraction and reflection.
Using a Transparent BSDF Node: In the material nodes, add a Transparent BSDF node and connect it to the material output. This node provides the foundational transparency needed to simulate a diamond’s optical characteristics.
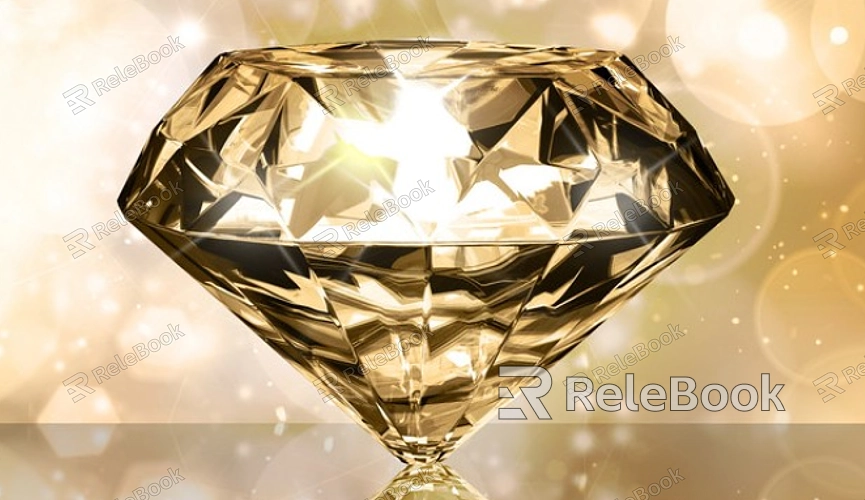
Adding a Glass BSDF Node: Incorporate a Glass BSDF node into the material and blend it with the Transparent BSDF node. Adjust the Index of Refraction (IOR) to 2.42, which is the actual IOR of diamonds. This adjustment ensures that the refraction is accurately simulated.
3. Enhancing Reflections with HDR
The high dynamic range of HDR images can produce complex and layered reflections on the diamond’s surface.
Using a Glossy BSDF Node: Add a Glossy BSDF node to the material and blend it with the Glass BSDF node. By adjusting the glossiness and roughness parameters, you can ensure the diamond surface exhibits realistic reflections.
Reflecting HDR Light Sources: Ensure that bright spots in the HDR image (such as the sun or other light sources) are reflected on the diamond’s surface, thereby amplifying the sparkle and brilliance of the diamond.
4. Optimizing Ray Tracing Settings
To fully showcase the diamond’s optical effects during rendering, optimizing Blender’s ray tracing settings is essential.
Enabling Caustics: Caustics simulate the light patterns created when light passes through or reflects off a transparent object like a diamond. In Blender, make sure to enable caustics in the rendering settings to capture these effects.
Increasing Reflection and Refraction Bounces: Increase the number of reflection and refraction bounces in the ray tracing settings. This ensures that light can adequately bounce within and on the diamond, producing complex and realistic light patterns.
5. Fine-Tuning Rendering Settings for Quality
Certain key settings during the rendering process can further enhance the appearance of the diamond texture.
Using a High Sample Rate: Raising the sample rate helps reduce noise and improve the clarity of the final render. Setting the sample rate above 2000 is recommended for achieving better quality.
Enabling Denoising: In Blender’s rendering settings, enable denoising to effectively reduce the noise generated during the rendering process, resulting in a cleaner, sharper image.
6. Rendering and Post-Processing
Rendering is the final step, but post-processing is equally important to add the finishing touches to your diamond effect.
Adjusting Color Balance and Contrast: During post-processing, adjust the color balance and contrast to further refine the visual impact of the diamond, making it look even more realistic.
Adding Glare and Glow Effects: In the compositing nodes, consider adding glare and glow effects to highlight the diamond’s brilliance and sparkle.
By leveraging HDR images and Blender’s advanced tools, designers can create incredibly realistic diamond textures. This process not only enhances the visual appeal of your work but also effectively showcases the unique optical properties of diamonds. This article has outlined the entire workflow, from setting up HDR lighting to creating materials, optimizing ray tracing, and rendering. If you’re seeking high-quality HDR image resources, 3D textures, SketchUp models, or 3ds Max models to create models and virtual scenes, Relebook offers a rich selection to help you achieve outstanding visual effects in your projects.
