How to Apply Sky Texture HDR in 3ds Max
In outdoor scenes, designers often need to add a sky background to enhance realism. Sky texture HDR (High Dynamic Range) provides natural lighting and detailed illumination, making it a popular choice in software like 3ds Max. In this article, we will explore how to apply sky texture HDR in 3ds Max. By following the steps outlined below, you’ll learn how to import, configure, and optimize HDR files to improve the lighting in your scenes.
1. Setting Up the Rendering Engine
Before using HDR, you first need to ensure that the rendering engine in 3ds Max is set up correctly. Two commonly used engines are Arnold and V-Ray.
Arnold: This is the default rendering engine in 3ds Max, capable of handling complex lighting calculations, making it ideal for working with HDR files.
V-Ray: Known for its flexible settings and faster rendering speed, V-Ray is another popular option that can also handle HDR rendering effectively.
To set up your rendering engine, navigate to the Render Setup panel in 3ds Max and choose the appropriate engine. This will ensure that the subsequent steps take full advantage of the dynamic lighting information within HDR files.
2. Importing HDR Files
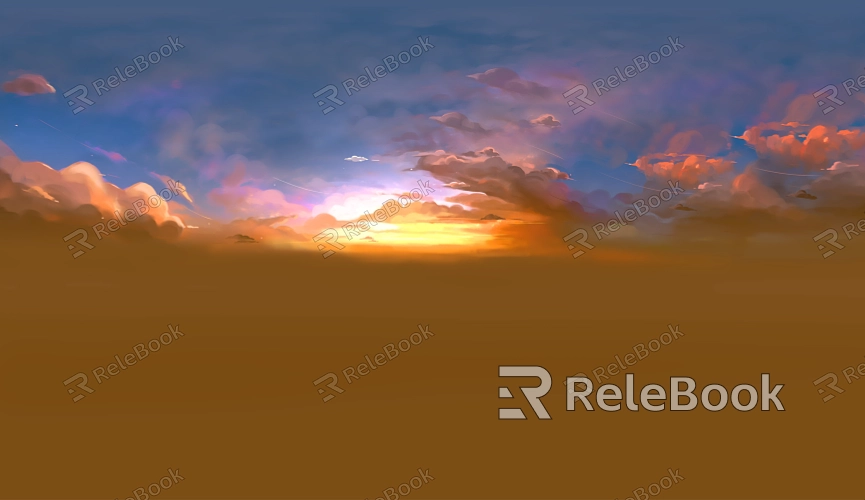
Importing the HDR file is a crucial step in creating a realistic sky effect. HDR files are typically stored in .hdr or .exr formats and can capture more detailed lighting and color information.
Head to the Environment and Effects settings in 3ds Max, then under the Environment Map section, click the empty slot and choose Environment Light Map. Next, select Bitmap and import the HDR file you've prepared.
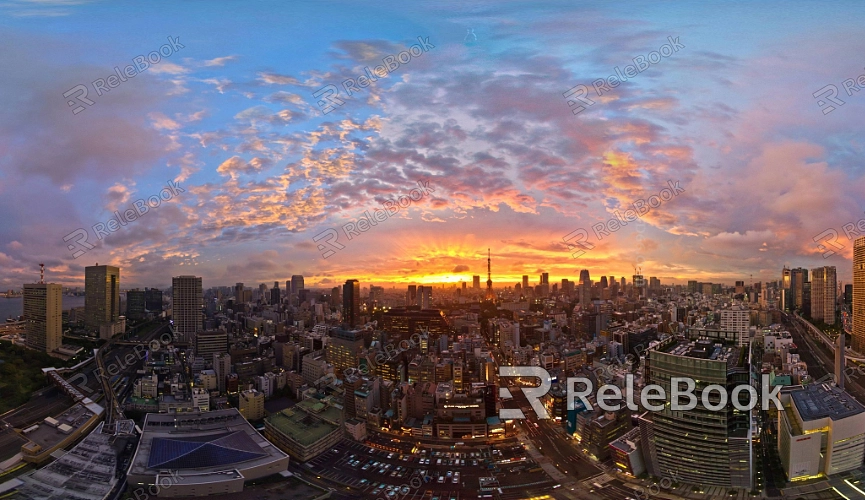
If finding HDR files seems complicated or time-consuming, you can easily download high-quality HDR files from Relebook at Relebook HDR Textures. This step enables 3ds Max to apply the HDR image as the primary light source, blending it with the sky texture to create a convincing lighting effect for the scene.
3. Adjusting HDR Brightness and Exposure
After importing the HDR file, you may need to tweak its brightness and exposure to match your scene’s needs.
In the Environment and Effects settings, you can find the Brightness option, which allows you to control the intensity of the sky’s lighting. If the scene feels too bright or too dim, this option provides a quick fix.
Moreover, exposure control is key to balancing lighting effects. Adjust the Exposure settings to fine-tune the brightness levels, ensuring the scene's lighting feels appropriate. This adjustment is particularly useful for simulating different times of day, such as daytime or dusk.
4. Using "Global Illumination" for Full Scene Control
To gain more control over the lighting in your scene, you can also use 3ds Max’s Global Illumination settings to further refine the HDR effect.
In the Environment settings, activate Global Illumination. This feature allows HDR to function not only as a background image but also as the primary light source for the entire scene.
By adjusting the reflection and refraction settings, you can create realistic shadows and reflections on surfaces within the scene, making the entire environment look more natural.
5. Advanced Adjustments Using the "Sky Map" Node
For more precise control over your HDR texture, you can leverage the Material Editor in 3ds Max. By adding various nodes, you can fine-tune how the HDR file behaves.
In the Material Editor, select the imported HDR texture and connect it to the Sky Map node. You can also add additional nodes like Color Correction or Exposure Control to further adjust the HDR’s lighting output.
Additionally, rotating the nodes can change the light source’s direction in the HDR texture, allowing you to simulate different times of day, such as morning or evening sunlight.
6. Selecting the Right HDR File
Choosing the correct HDR file for your project is essential since different files suit different scenarios. Here are some common HDR types:
Clear Sky: Ideal for open outdoor environments, providing bright and abundant light.
Overcast: Simulates softer, diffused lighting, perfect for evening or more subdued scenes.
Night Sky: Suitable for night scenes, mimicking moonlight or city lights.
Selecting the right HDR file will significantly enhance the final rendering of your scene.
7. Real-Time Preview of HDR Effects
In 3ds Max, you can use the real-time preview function to observe how the HDR lighting affects your scene as you work. Switch to real-time preview mode to instantly see changes in lighting, allowing you to adjust brightness, angle, or exposure in real-time. This ensures that the final outcome matches your expectations.
8. Combining Physical Sky with HDR
Sometimes, you may want to use both HDR textures and 3ds Max’s Physical Sky system to create a more complex lighting setup.
Use the HDR texture as the primary light source, while applying the Physical Sky material to the foreground. This technique enhances the detail and realism of the sky while still maintaining accurate lighting throughout the scene.
9. Outputting High-Quality Renders
Once you’ve completed setting up and optimizing the HDR texture for your scene, the next step is to render the final image. 3ds Max supports various output formats such as PNG, JPEG, and EXR.
For the best results, especially if you plan to do further post-production work, it's recommended to export in EXR format. This format retains more light information, allowing for easier adjustments later.
By following the steps outlined in this article, you now have a solid understanding of how to apply sky texture HDR in 3ds Max. Whether you're importing HDR files, adjusting brightness and exposure, or combining them with Physical Sky for advanced control, these techniques will help you create more realistic, detailed renders. For designers who frequently work on outdoor scenes, mastering HDR is a powerful way to elevate the quality of your work.
If you’re looking for high-quality HDR images, 3D textures, or 3ds Max models, Relebook is a great resource. Downloading textures and models from Relebook not only enhances your renders but also helps save valuable time.
