How to Render Out Outlines for Blue prints in Blender
In the world of 3D modeling and design, rendering a model’s outlines into blueprints is a common and important task. This technique not only helps create detailed design documents but also provides clear references for further modeling or production. Blender, with its powerful 3D modeling and rendering capabilities, makes it easy to achieve this goal. This article will guide you through the process of rendering blueprint outlines in Blender and offer some practical tips and suggestions.
Preparing Your Model and Setting Up the Scene
Before you start rendering blueprint outlines, you need to prepare your 3D model and set up the scene. This includes selecting your model, arranging light sources, and configuring the camera.
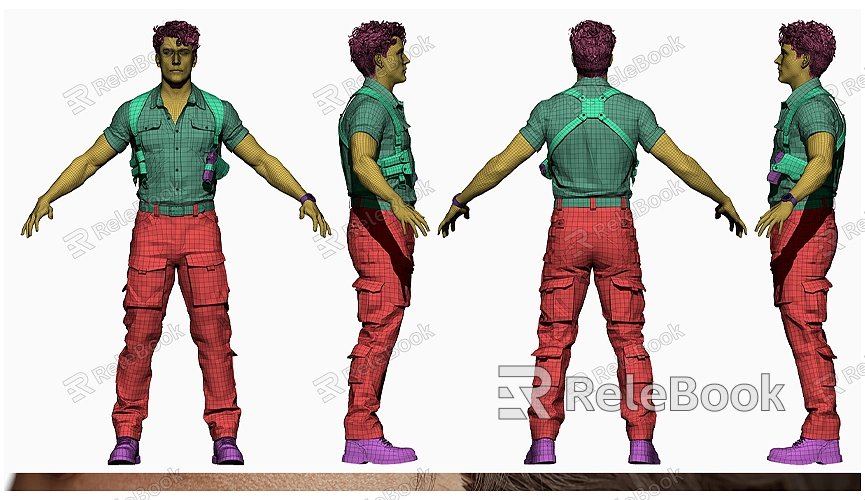
1. Ensure Model Completeness: Make sure your 3D model is complete and its geometry is clearly visible. Blueprint outlines typically need to accurately display the model’s boundaries, so all details and edges of the model should be clearly defined.
2. Set Up Lighting: For clear outline effects, use a simple light source like a parallel light. Proper lighting setup can help avoid shadows that might affect the visibility of the outlines.
3. Adjust Camera Position: Position the camera at an angle and distance that ensures the model’s outline is fully captured in the render. Adjust the camera settings based on your needs to get the desired view of the model’s outlines.
Setting Up Outline Materials
To render clear blueprint outlines, you need to set up appropriate materials for the model. Follow these steps to configure outline materials:
1. Create a New Material: Go to the “Material” panel and click the “New” button to create a new material. Name the material for easy identification.
2. Configure Material Properties: In the “Material” panel, set the material’s “Type” to “Wireframe” or “Edge”. This will display the model’s outlines as lines.
3. Adjust Color and Thickness: Set the color and thickness of the outlines as needed. Choose a high-contrast color, such as white or black, to ensure the outlines are clearly visible in the render.
4. Apply the Material: Apply the newly created material to your model. Ensure that the entire outline of the model is correctly displayed.
Rendering Outlines with Freestyle
Blender’s Freestyle rendering engine is specifically designed for rendering outlines and lines. Here’s how to use Freestyle for outline rendering:
1. Enable Freestyle: In the “Render” panel, find the “Freestyle” option and enable it. This will activate Freestyle rendering features.
2. Configure Freestyle Settings: Under the “Freestyle” settings, configure the style and parameters of the outline lines. Choose “Line Style” and set properties such as “Line Width” and “Color” to adjust the appearance of the outlines.
3. Adjust Line Types: You can select different line types, such as “Edge Lines” or “Contour Lines,” to suit different rendering needs. Adjust these settings based on the complexity of the model and your requirements for the best results.
4. Preview the Render: Once you’ve configured the settings, perform a render preview. Check if the outline effect meets your needs. If necessary, further adjust the Freestyle settings until you achieve the desired effect.
Exporting and Saving Blueprint Outlines
After rendering, you need to export and save the blueprint outline image. Follow these steps:
1. Choose Output Format: In the “Output” panel, select an appropriate image format such as PNG or JPEG. These formats are suitable for documents or printing.
2. Set Resolution: Adjust the resolution of the image according to your needs. Higher resolution provides clearer details but also increases file size.
3. Export the Image: Click the “Render” button, and Blender will generate and export the outline image. Save the file to your computer and check the image’s quality and effect.
Practical Applications
Rendering blueprint outlines is highly useful in various practical applications. For instance, architects can use this method to create detailed building blueprints for construction and presentation. Industrial designers can use it to showcase product design details for discussion and revision with team members and clients. Whether for design documents or reference drawings, rendering blueprint outlines can effectively support your work.
Rendering blueprint outlines in Blender is a practical and essential skill that helps create clear design documents and reference drawings. By learning how to set up outline materials, use Freestyle rendering tools, and export images, you can easily achieve this goal. If you need high-quality 3D textures and HDRIs for your models and virtual scenes, you can download them for free from [Relebook](https://textures.relebook.com/). For exquisite 3D models, visit [Relebook](https://3dmodels.relebook.com/), where Relebook offers a wide range of premium 3D resources. Utilizing these resources can further enhance your design quality and efficiency, making your projects stand out. We hope this guide helps you successfully render blueprint outlines in Blender and improves your 3D design skills.
