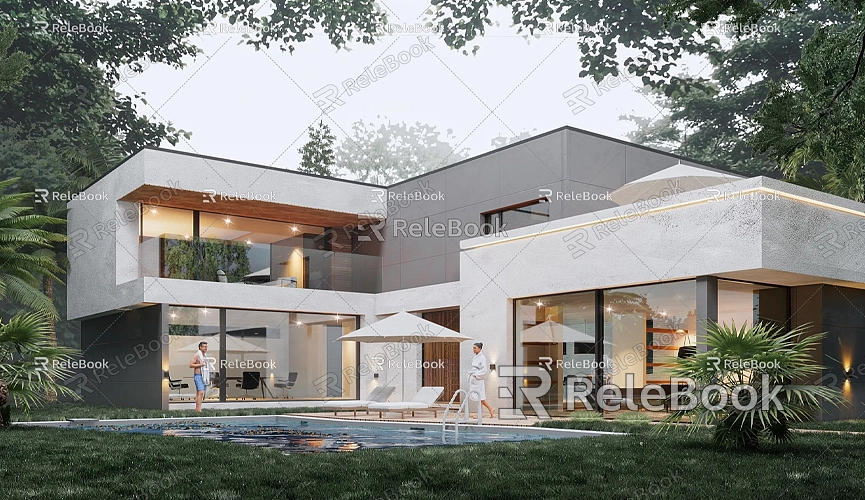
How to Take Pictures of SketchUp Model
In the modern design field, SketchUp is favored by architects, designers, and students for its intuitive interface and powerful 3D modeling capabilities. While modeling is a crucial part of the design process, showcasing the model through visually impactful images is another key aspect of design presentation. Whether for presenting work, participating in competitions, delivering design reports, or showcasing to clients and on social media, knowing how to take high-quality photos of your SketchUp models is essential. This article will introduce key steps and techniques for capturing stunning photos of your SketchUp models.
1. Optimize Model Settings
Before taking photos of your SketchUp model, ensure that its display is fully optimized. To present the model in the best light, focus on several aspects.
Model Details and Textures
Details make all the difference, especially in close-up shots where the quality of the model's details will determine the photo's overall quality. During the modeling phase, add high-quality textures to ensure that every surface looks realistic. While SketchUp’s built-in texture library may meet basic needs, downloading and using external high-quality textures is recommended for better visual impact.
Additionally, proper texture scaling and alignment are crucial. If the textures do not match the model or are disproportionately sized, the final photo will look unprofessional. For high-quality 3D textures and HDRI resources, you can download many free assets from [Relebook Textures](https://textures.relebook.com).
Adjust the Model Structure
Whether it's a building model or a product model, how the model is presented in 3D space greatly impacts the final photo. Ensure that every part of the model is perfectly aligned and that the angles are appropriate. Check for any visual errors or flaws. Before taking photos, rotate the model to preview different angles and ensure everything looks correct.
2. Choose the Right Angle
SketchUp offers various viewpoints and camera tools to help you view the model in different ways. The choice of angle directly affects the final result when photographing your SketchUp model.
Standard vs. Custom Angles

You can choose between the commonly used "Parallel Projection" and "Perspective" views in SketchUp. Parallel projection is suitable for technical drawings, clearly showcasing the lines of the building or product, while perspective view closely resembles human vision, ideal for generating realistic images.
Custom camera angles are also important. Experiment with different heights, distances, and angles. Low-angle shots can make buildings appear more imposing, while bird's-eye views are great for displaying floor layouts and overall designs. Choosing the right angle can help accurately convey your design intent.
Rule of Thirds Composition
Composition is one of the keys to taking great photos. The rule of thirds is a simple yet effective composition technique. Position the camera at an appropriate height, placing the key elements of the model along the lines of the thirds to attract viewers' attention and create a visual focus, enhancing the aesthetic appeal of the photo.
3. The Importance of Lighting and Shadows
Lighting and shadows are critical factors in enhancing the quality of model photos. Good lighting can significantly boost the model's dimensionality and visual impact. In SketchUp, you can simulate sunlight to add natural lighting effects to your model.
Adjusting Light Position and Intensity
Using the "Shadows" tool in SketchUp, you can control the angle and intensity of sunlight by changing the time of day and geographical location. Different lighting conditions will affect the model differently. For example, soft shadows and contrasts are created by low-angle light during dawn or dusk, while midday light is more uniform. If you want to highlight a particular part of the model, consider using side or backlighting to add depth.
Using HDRI
High Dynamic Range Imaging (HDRI) can greatly enhance rendering effects, particularly in terms of lighting and environmental reflections. By using HDRI maps, you can create a more realistic lighting environment and background for your SketchUp model. HDRI not only improves the realism of the model but can also simulate various weather, time, and scene conditions, giving the model a more immersive visual effect. For high-quality HDRI resources, visit [Relebook Textures](https://textures.relebook.com).
4. Rendering to Enhance Visual Effects
The rendering capabilities built into SketchUp are limited, so using third-party renderers is essential for improving the model's realism and presentation quality. There are many excellent rendering plugins available, such as V-Ray, Lumion, and Enscape, which can add realistic lighting, material reflections, and shadow effects to your SketchUp model.
Preparation Before Rendering
Before rendering, ensure that the model's materials, lighting settings, and camera angles are properly adjusted. Also, check the renderer’s settings and select the appropriate output resolution. High-quality render outputs may take longer, but they significantly enhance the details and clarity of the model's presentation.
Suitable Rendering Styles
Different projects may require different rendering styles. For architectural designs, a realistic style is often pursued, while in interior or product design, a more minimalistic rendering effect may be appropriate. Adjust rendering parameters based on project needs to ensure that the final image aligns with the design style.
5. Post-Processing to Enhance Photo Quality
Even after rendering, post-processing is a key step in improving photo quality. Using post-processing software like Photoshop or Lightroom, you can further optimize your images.
Adjusting Lighting and Contrast
Common post-processing techniques include adjusting brightness, contrast, and saturation. By slightly increasing the contrast, you can enhance the clarity of the model's details; appropriate saturation adjustments can make colors more vivid, enhancing the model's visual appeal.
Adding Backgrounds and Environments
If the background of the rendered image seems too plain, you can use post-processing to add an appropriate backdrop. Using tools like Photoshop, you can overlay skies, cityscapes, or natural environments, making the model appear more realistic.
6. Output and Share
After capturing, rendering, and post-processing, ensure the final image is output at a high resolution. Typically, images at 1920x1080 or higher will meet most display needs, but for printing or large displays, you may require even higher resolution. Choosing the right file format is also crucial; PNG format preserves more detail, while JPEG is better suited for online sharing.
When sharing your models, maintain the clarity and compression ratio of the files to ensure that images retain high-quality visual effects across different platforms.
Taking photos of your SketchUp models is a task that requires attention and skill. To capture high-quality model photos, start with optimizing the model, then enhance the visual effects using the right angles, lighting, and rendering tools. Post-processing should not be overlooked, as it can further refine the image quality.
Finally, selecting the right resources and tools can make the entire process much more efficient. If you need high-quality 3D textures and HDRI resources while creating models and virtual scenes, you can download them for free from [Relebook Textures](https://textures.relebook.com). For exquisite 3D models, visit [Relebook Models](https://3dmodels.relebook.com). Relebook offers a wealth of quality 3D resources to help enhance the visual impact of your models.
