How to open render settings blender
Blender is a powerful open-source 3D modeling and rendering software widely used in animation, gaming, and visual effects production. Knowing how to access and adjust render settings in Blender is crucial for anyone looking to create high-quality images and animations. This guide will detail how to open and optimize render settings in Blender to enhance your project’s rendering effects.
Opening Blender and Creating a New Project
First, ensure you have the latest version of Blender installed. Upon launching Blender, you’ll see the default startup interface, which includes a cube, a camera, and a light source. If you already have an existing project, you can open it directly.
Accessing the Render Settings Panel
At the top menu bar of Blender’s interface, there is a “Render” option. Clicking on “Render” reveals a dropdown menu with options such as “Render Image” and “Render Animation.” To access detailed render settings, you need to open the “Properties” panel.
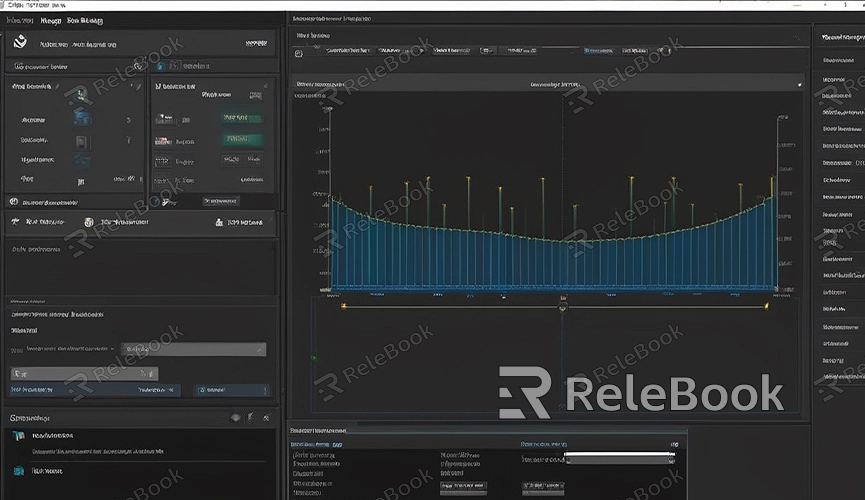
1. Open the Properties Panel: In the properties area on the right side of Blender, find the button with a camera icon. This is the “Render Settings” button; click on it.
2. View Render Settings: After clicking the camera icon, you will see a series of render settings options, including the render engine, resolution, and sampling rate.
Choosing a Render Engine
Blender offers multiple render engines, each with its unique features and uses. Commonly used render engines include:
- Eevee: A real-time render engine suitable for quick previews and real-time effects.
- Cycles: A path-tracing render engine ideal for high-quality still images and animations.
- Workbench: Primarily used for modeling and previews, not suitable for final rendering.
In the “Render Engine” option, you can select the appropriate render engine based on your project’s needs.
Setting Render Resolution
The render resolution determines the final image or animation’s clarity. In the “Output Properties” panel, you can set the image’s width and height. Typically, a resolution of 1920x1080 is suitable for most projects. If you need a higher resolution, you can adjust accordingly.
Adjusting Sampling Rate
The sampling rate is a crucial parameter that affects image quality. Higher sampling rates result in clearer images but also increase render time. In the “Render Settings” panel, you can adjust the “Sampling” option. For preview renders, a lower sampling rate can be set; for final renders, a higher sampling rate can be used to achieve better image quality.
Configuring Ray Tracing and Global Illumination
If you choose to use the Cycles render engine, you can configure ray tracing and global illumination settings. These settings significantly enhance the image’s realism but also increase render time. In the “Ray Tracing” options, you can adjust parameters such as “Reflections,” “Refractions,” and “Shadows” to achieve optimal results.
Optimizing Render Time
To minimize render time while maintaining image quality, consider the following methods:
- Lower the Sampling Rate: Reduce the sampling rate as much as possible without compromising image quality.
- Use Denoiser: Blender provides built-in denoising tools that can improve image quality at lower sampling rates.
- Simplify the Scene: Reduce the complexity of models and materials in the scene to speed up rendering.
Saving Render Settings
After completing all settings, you can save the current configuration as the default for future projects. In the “File” menu at the top of Blender, select “Defaults” > “Save Startup File” to save the current settings as the default startup configuration.
By following these steps, you have learned how to access and adjust render settings in Blender to optimize your project’s rendering effects. If you need high-quality 3D textures, HDRIs, or 3D model downloads for creating models and virtual scenes, you can get them from Relebook. After downloading, simply import the textures and 3D models into your project for use.
