How to Fix Stretched UV Maps in Maya?
In 3D modeling, UV mapping is essential for applying 2D textures to 3D models. However, one common issue that arises is UV map stretching, which can distort textures and make them look unnatural on the model’s surface. This is a frequent problem when using software like Maya. If left unresolved, stretched UVs can significantly impact the visual quality of your model, making it appear unprofessional. In this article, we'll dive into how to fix stretched UV maps in Maya, providing practical tips and solutions.
What is UV Mapping and Why Is It Important?
UV mapping is a technique that flattens the surface of a 3D model into 2D space, making it easier to apply 2D images (like textures) to the model. Every model has a unique UV layout that determines how textures are displayed across its surface. When UV stretching occurs, the 2D texture is not evenly distributed on the model, causing certain areas to become compressed or stretched. Fixing stretched UV maps is crucial for achieving a realistic and evenly textured model.
Common Causes of Stretched UV Maps
Before diving into how to fix UV stretching, it’s important to understand the common causes behind it. Here are a few primary reasons:
1. Uneven UV layout
Some parts of the model may occupy a disproportionate amount of UV space, leading to texture stretching or compression.
2. Complex geometry
Models with highly intricate or curved surfaces require careful UV unwrapping, and poor unwrapping can result in stretching.
3. Incorrect projection method
Choosing the wrong UV projection technique can cause noticeable stretching on the model’s surface.
4. Scaling the model
When scaling a model without adjusting its UV map, the textures may become distorted.
Understanding these causes will help you diagnose the issue and choose the right method to fix it.
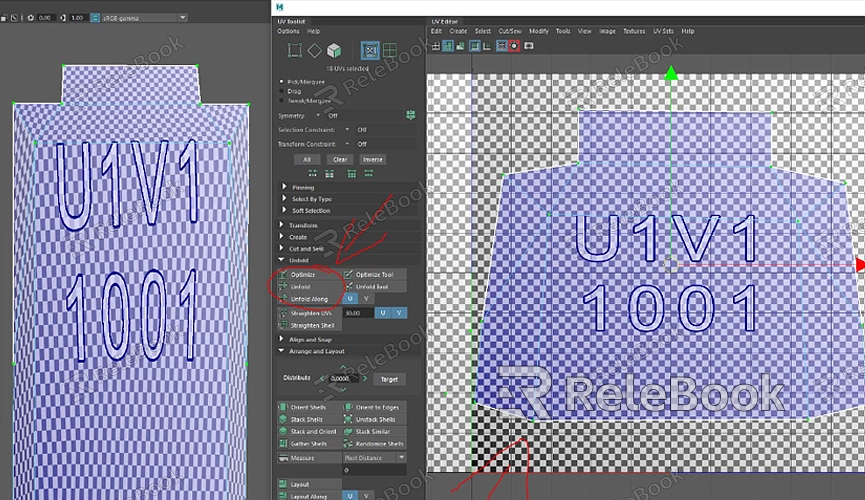
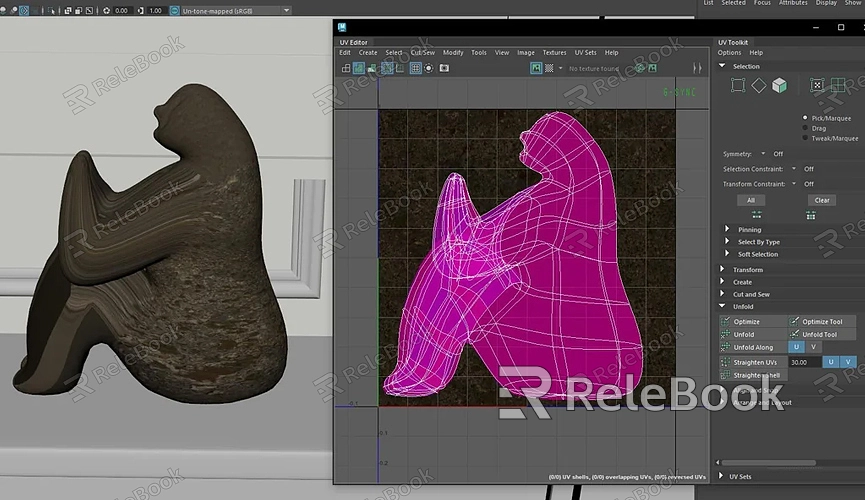
Adjusting in the UV Editor
The UV Editor in Maya is the central tool for handling UV maps. It provides a visual representation of your model’s UV layout in 2D space. To fix UV stretching, you can follow these steps:
1. Open the UV Editor
After selecting your model, go to UV > UV Editor to open the UV Editor. Here, you can view your model’s UV layout.
2. Identify stretched areas
Use the "UV Stretch Display" feature in the editor to spot stretched areas. Red or blue regions typically indicate stretching or compression.
3. Adjust the UV scale
Select the stretched UVs and scale, move, or rotate them as needed to align them with the rest of the UVs. Make sure your UVs are distributed evenly across different parts of the model.
This method helps reduce stretching and makes the texture application more natural.
Using the Automatic Unfold Tool
For complex models, manually adjusting UVs can be time-consuming. In such cases, Maya’s automatic unfolding tool can help you quickly resolve the issue.
1. Use the UV Unfold Tool
After selecting your model, go to the UV tools menu and select the "Automatic Unfold" option. This tool automatically generates a more even UV layout based on the model’s geometry, reducing the need for manual adjustments.
2. Tweak Unfold settings
While the automatic unfold tool is useful, the default settings might not always be perfect. You can adjust the unfold iterations or edge weighting values to achieve a more accurate result.
This approach works well for complex models and can significantly reduce UV stretching in a short amount of time.
Optimizing the Projection Method
Sometimes UV stretching occurs because of using an improper UV projection method. Maya offers several projection techniques, and choosing the right one can help minimize UV stretching.
1. Planar projection
Best for simple, flat surfaces. It projects a 2D plane over the model, ensuring even texture distribution.
2. Spherical projection
Ideal for spherical or near-spherical objects like planets. This method minimizes stretching on curved surfaces.
3. Cylindrical projection
Often used for models with cylindrical shapes. It projects UVs in a way that avoids stretching along the cylinder’s surface.
Selecting the appropriate UV projection method based on the shape of your model is key to fixing UV stretching.
Adjusting Model Geometry
If adjusting UVs still doesn’t fully resolve the stretching issue, the model’s geometry itself might be the problem. Complex or irregular geometries can make it difficult for UV maps to lay evenly across the surface. In these cases, you can try the following steps:
1. Add more geometry
Adding more subdivisions to your model can help create a more even UV layout. This is especially helpful for highly curved or intricate surfaces.
2. Optimize topology
simplifying or reworking your model’s topology can help create a more uniform and even surface, making UV unwrapping and texture application easier.
These steps tackle the root cause of UV stretching, ensuring the issue is resolved at the geometry level.
Fixing stretched UV maps in Maya is not a difficult task once you know how to use the UV Editor, choose the right projection method, and optimize your model’s geometry. By following the solutions in this article, you can efficiently correct UV stretching and improve the overall quality of your 3D models. If you're looking for more high-quality 3D models and textures, visit Relebook to download the latest resources to enhance your projects.
FAQ
Why are my UVs always stretched?
UV stretching is typically caused by an uneven UV layout or using an incorrect projection method. You can fix this by adjusting the UV scale and selecting the proper projection technique.
What if the automatic unfold tool doesn’t work well?
The automatic unfold tool’s default settings may not work for all models. You can manually adjust the unfold parameters or use manual adjustments on specific areas that still need improvement.
How can I avoid UV stretching in the future?
Ensure your model’s geometry is as uniform as possible, plan your UV layout carefully, and choose the correct projection method. Regularly checking for UV stretching during the process will help avoid future issues.
How do I use the UV Stretch Display in Maya?
In the UV Editor, enable the “UV Stretch Display” option. Red and blue areas indicate stretched or compressed UVs, helping you identify problem areas for adjustment.
