How to Turn a 2D Drawing into a 3D Model
In 3D design, converting a 2D drawing into a 3D model is a common and essential process. This technique allows designers to transform flat artistic creations into three-dimensional models, widely used in game development, animation, and virtual reality. This article will provide a clear, step-by-step guide on how to turn a 2D drawing into a 3D model.
Preparation
Before you start, make sure you have a completed 2D drawing and are familiar with basic 3D modeling software. Common 3D modeling software includes Blender, Maya, and 3ds Max. This guide will use Blender as an example.
1: Import the 2D Drawing
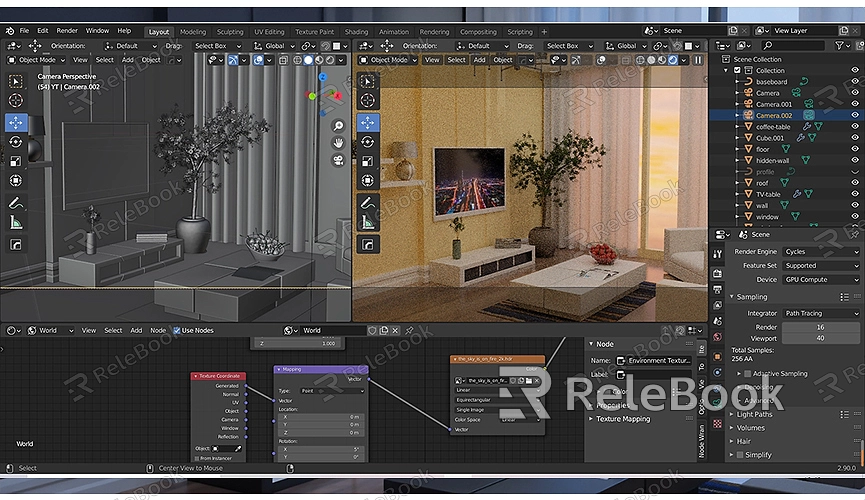
1. Open Blender: Launch the Blender software and create a new project or open an existing one.
2. Import the 2D Drawing: In Blender, select the “Add” menu, then choose “Image” > “Background” to import your 2D drawing. Select your drawing file and add it to the view, allowing you to reference the image during modeling.
3. Set Image Position: Adjust the position and size of the image so that it fits your modeling work. Ensure that the image is clearly visible in the front view for accurate modeling.
2: Create Basic 3D Shapes
1. Add Basic Geometry: In Blender, select the “Add” menu and choose a basic geometry that suits your model. For example, if your drawing depicts a simple object, you might select a cube, cylinder, or sphere as the base shape.
2. Adjust the Base Shape: Enter Edit Mode (Tab key) and use the Move (G key), Scale (S key), and Rotate (R key) tools to modify the base shape to match the contours of your 2D drawing.
3: Refine the Modeling
1. Use Edit Mode: In Edit Mode, refine the base shape. Use the Knife Tool (K key) to cut new edges on the model’s surface and add more detail.
2. Add Details: Gradually add and adjust details based on your 2D drawing. For example, use the Extrude tool (E key) to add extra faces, or use Loop Cut (Ctrl + R) to add more edge loops.
3. Align the Model: Ensure your 3D model aligns with the contours of the 2D drawing. Switch between different views to verify that all parts of the model correspond accurately to the drawing.
4: Add Materials and Textures
1. Create a Material: In the “Material Properties” panel, create a new material and apply it to your 3D model.
2. Add Textures: In the “Texture” panel, add textures and map them to the model's surface. You can use the UV unwrap feature to apply your 2D drawing as a texture map on the model.
3. Adjust Material Properties: Modify the material's color, glossiness, and transparency as needed to achieve the desired appearance.
5: Optimize and Render
1. Optimize the Model: Check the model’s topology and fix any errors or inconsistencies. Optimize the polygon count to improve rendering efficiency.
2. Set Up Lighting and Camera: Add light sources and a camera to the scene, adjusting their positions and settings to ensure the model displays its best features during rendering.
3. Render the Model: Choose an appropriate rendering engine (such as Cycles or Eevee) and perform the final render. Review the rendered image to ensure the details and material effects meet your expectations.
Tools for Enhancing Modeling Efficiency
Using additional tools and resources can improve efficiency during 3D modeling. For example, if you need high-quality 3D textures and HDRIs for your models and virtual scenes, you can download them for free from [Relebook](https://textures.relebook.com/). If you need beautiful 3D models, you can also find them at [Relebook](https://3dmodels.relebook.com/), which offers a wide range of premium 3D resources to enhance your design quality and efficiency.
The process of turning a 2D drawing into a 3D model involves multiple steps: importing the drawing, creating base shapes, refining the model, adding materials and textures, and optimizing and rendering. By mastering these techniques, you can effectively transform flat artistic creations into three-dimensional models for various digital art and design projects.
I hope the steps and tips in this article help you successfully convert a 2D drawing into a 3D model, bringing your creative ideas to life in a more vibrant and dimensional way. If you have any questions or need further resources, consider checking out the high-quality 3D textures and models available at [Relebook](https://textures.relebook.com/) to assist you in your modeling process.
