How to Render Revit Model in 3ds Max?
1. Preparing Your Revit Model
Before exporting your Revit model to 3ds Max, it's essential to prepare the model to ensure a smooth transition. This preparation involves cleaning up the model, organizing layers, and ensuring that materials and textures are properly applied.
1. Clean Up the Model
Begin by reviewing your Revit model for any unnecessary elements that could complicate the rendering process. Remove or hide objects that won't be visible in the final render, such as internal walls, furniture, or other details that are irrelevant to the exterior render. This step not only simplifies the model but also reduces the file size, making the export process faster.
2. Organize Layers and Views
Next, ensure that your model is organized into layers or categories that make sense for rendering. For example, group similar elements like windows, walls, roofs, and landscaping together. Additionally, create a specific 3D view in Revit that shows only the elements you want to render. This view will be used when exporting the model to 3ds Max.
3. Apply Materials and Textures
Revit allows you to apply materials and textures to your model, but these may not always translate well into 3ds Max. To avoid issues, it's recommended to assign standard materials in Revit, which you can then replace or enhance in 3ds Max. This step ensures that your model has a basic material setup that can be refined later.
Exporting the Revit Model to 3ds Max
Once your model is prepared, the next step is to export it from Revit to 3ds Max. Autodesk provides several ways to transfer data between the two programs, but the most reliable method is using the FBX (Filmbox) format.
1. Export as FBX
To export your Revit model, go to the "File" menu and select "Export." Choose the "FBX" option, which is the preferred format for transferring 3D models between different Autodesk software. In the export dialog, select the 3D view you prepared earlier. Ensure that the export settings are configured to include all necessary details, such as textures, lights, and cameras.
2. Adjust Export Settings
Before finalizing the export, review the settings to ensure that the model's scale, units, and other parameters are correctly configured. This step is crucial because inconsistencies in scale or units can cause significant issues when importing the model into 3ds Max.
3. Import the FBX File into 3ds Max
With the FBX file exported, open 3ds Max and create a new project. Use the "Import" function to bring the FBX file into 3ds Max. During the import process, you may need to adjust settings to ensure that the model is correctly aligned and that all materials and textures are imported. If you encounter any issues, such as missing textures or incorrect scaling, refer back to the export settings in Revit and try exporting again.
Setting Up the Scene in 3ds Max
After successfully importing your Revit model into 3ds Max, the next step is to set up the scene for rendering. This process involves refining materials, setting up lighting, and choosing the right camera angles.
1. Refine Materials
Although materials and textures are imported from Revit, they may need refinement in 3ds Max. Use the Material Editor in 3ds Max to enhance these materials, adjusting properties like reflection, glossiness, and bump maps to achieve a more realistic look. You can also replace the imported materials with higher-quality ones available in 3ds Max or from external libraries.
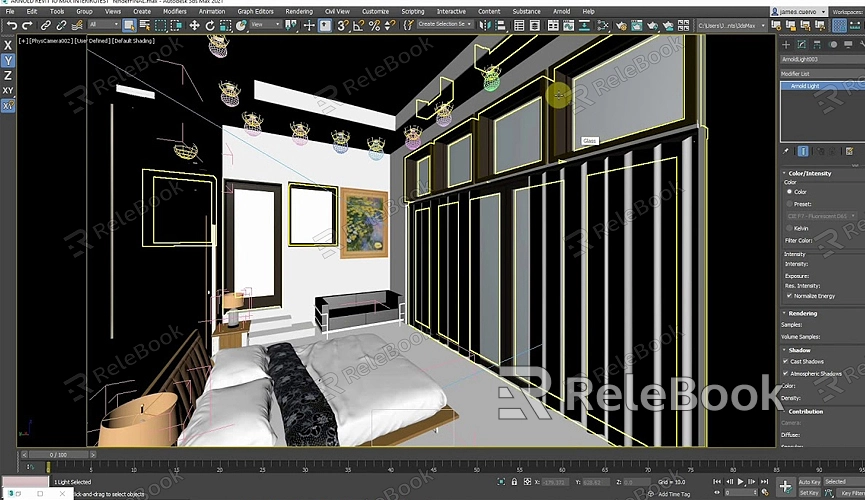
2. Set Up Lighting
Lighting is one of the most critical aspects of rendering. In 3ds Max, you have various lighting options to choose from, including photometric lights, standard lights, and daylight systems. For architectural visualizations, the daylight system is often the best choice as it simulates natural sunlight and can be adjusted to match the geographic location and time of day of your project.
3. Choose Camera Angles
The camera setup in 3ds Max allows you to control the perspective and framing of your render. Position the camera to capture the most important aspects of your model, whether it's a wide-angle view of the entire building or a close-up shot of specific architectural details. Experiment with different camera angles and focal lengths to find the most effective composition for your render.
Rendering the Model
With the scene set up, you're ready to render your Revit model in 3ds Max. This stage involves configuring the rendering settings and initiating the rendering process.
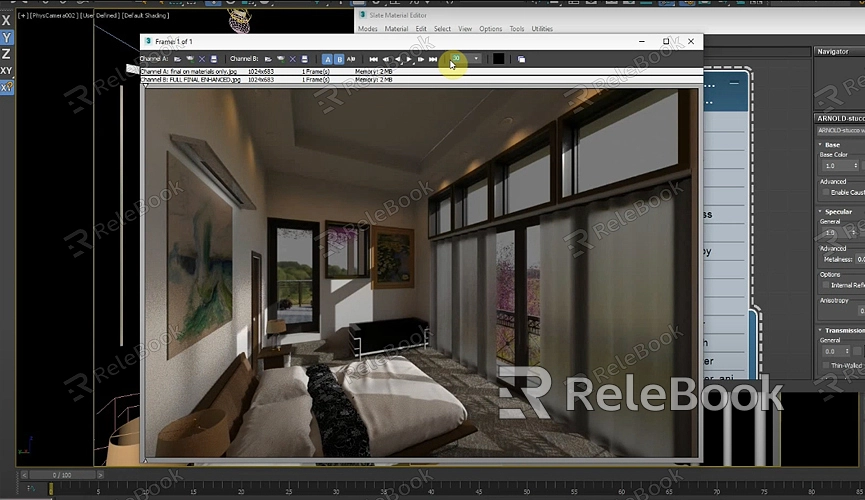
1. Configure Rendering Settings
Before rendering, configure the rendering settings in 3ds Max. This includes choosing the rendering engine (such as Arnold or V-Ray), setting the output resolution, and adjusting quality settings like anti-aliasing and global illumination. The choice of rendering engine and settings will depend on the desired level of detail and the available hardware.
2. Test Renders
Performing test renders is a crucial step to ensure that your scene is set up correctly. Start with low-resolution test renders to quickly assess lighting, materials, and overall composition. Make necessary adjustments based on the test renders, such as tweaking light intensity, adjusting camera angles, or refining material properties.
3. Final Render
Once you're satisfied with the test renders, initiate the final render. Depending on the complexity of the scene and the rendering settings, this process can take anywhere from a few minutes to several hours. Ensure that your computer has enough resources to handle the render, and consider using network rendering if available to speed up the process.
Post-Processing and Final Touches
After rendering the image, you may want to perform some post-processing to enhance the final result. This can be done using software like Adobe Photoshop or Autodesk Composite.
1. Color Correction and Enhancements
In post-processing, you can adjust the color balance, contrast, and brightness of your render to achieve the desired look. You can also add effects such as depth of field, lens flares, or vignetting to enhance the realism of the image.
2. Compositing
If you have rendered different elements separately (such as background, foreground, and reflections), compositing them together in post-processing can give you greater control over the final image. This technique is particularly useful for creating complex scenes with multiple layers.
3. Final Output
Once post-processing is complete, save the final image in your preferred format, whether it's JPEG for web use or TIFF for high-quality print. If you're working on an animation, export the sequence as a video file.
FAQ
Can I render Revit models directly in 3ds Max without exporting them as FBX?
Yes, you can use the "Link Revit" feature in 3ds Max to directly link your Revit model. This allows for live updates between Revit and 3ds Max. However, exporting as FBX is often preferred for greater control over the imported data.
What is the best rendering engine to use in 3ds Max for architectural visualization?
Both Arnold and V-Ray are excellent choices for architectural visualization. Arnold is integrated into 3ds Max and offers a powerful, easy-to-use solution, while V-Ray is known for its flexibility and high-quality output.
How can I reduce rendering times in 3ds Max?
To reduce rendering times, optimize your scene by lowering the polygon count, using proxy objects for complex models, reducing the number of lights, and adjusting the rendering settings for lower quality during test renders. Additionally, consider using network rendering or cloud-based rendering services.
Why do some materials look different in 3ds Max compared to Revit?
Revit and 3ds Max use different material systems, so some materials may not translate perfectly between the two programs. Refining or replacing materials in 3ds Max after import can help achieve the desired appearance.
Can I animate my Revit model in 3ds Max?
Yes, 3ds Max is highly capable of animating Revit models. You can create walkthroughs, flyovers, or any other type of animation to showcase your design.
