How to Make a 3D Model of Landforms
Creating a 3D model of landforms is becoming increasingly popular in modern digital design, especially in game development, virtual reality, and architectural design. A realistic terrain model can add depth and authenticity to an entire scene. If you’re new to terrain modeling, this guide will walk you through the process of creating a lifelike terrain model using 3D modeling software.
Choosing the Right Software
To create a 3D model of landforms, you first need a powerful 3D modeling software. Blender, Maya, and Cinema 4D are popular choices. If you’re not familiar with these programs, starting with Blender is a good option—it’s free and offers extensive tutorials and community support.
These software tools allow you to flexibly create various terrain models, whether it's mountains, valleys, or plains. You can adjust vertices and faces to represent complex landforms.
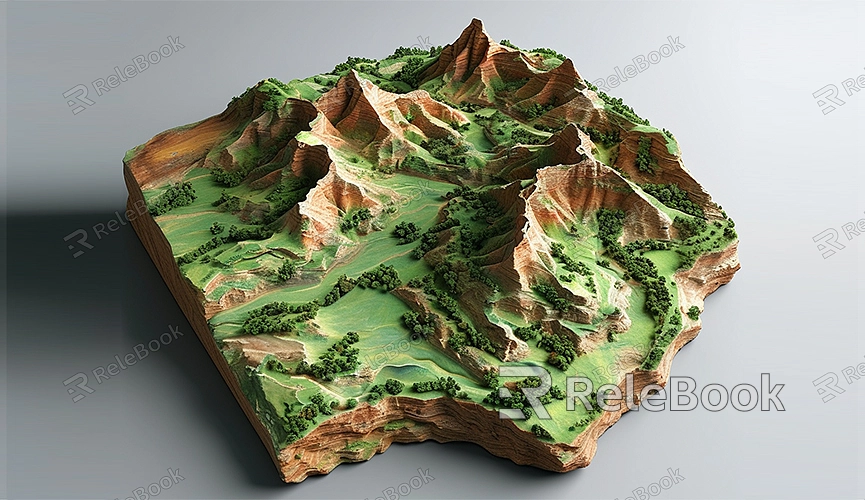
Creating the Basic Terrain
Start modeling with a basic plane. In Blender, you can add a plane and subdivide it to create an initial terrain grid. After subdividing the plane, you can begin adjusting vertices to shape the terrain.
To achieve realistic terrain effects, use sculpting tools. These tools help you manually adjust the model to simulate natural landforms such as peaks and valleys. Additionally, Blender’s Displacement Mapping feature allows you to quickly generate complex terrain surfaces using high-quality displacement maps.
Using Displacement Maps
Displacement maps are a common technique to create detailed terrain effects without increasing mesh complexity. You can download pre-made displacement maps from the internet or create your own using height maps. Applying a displacement map to your plane model allows the software to generate terrain elevation based on the map's light and dark values.
Displacement maps save modeling time and ensure detailed terrain, which is particularly useful for large-scale scenes. If you need high-quality 3D textures and HDRIs for creating models and virtual scenes, you can download them for free from [Relebook](https://textures.relebook.com/). Relebook provides a wealth of premium resources to make your models more realistic.

Adding Materials and Textures
After completing the basic terrain modeling, the next step is to add materials and textures. Terrain materials often include various textures such as grass, rock, and sand. In Blender, you can use material nodes to apply multiple layers of materials to the terrain and use texture maps to give different areas unique appearances.
For instance, rocky textures can be applied to mountain areas, while grass textures can be used for plains. By blending multiple materials, your terrain model will have more realism and detail. You can control the distribution of textures through weight painting, allowing the software to determine where each material appears.
Lighting and Environment Setup
Lighting and environment settings significantly impact the final look of your terrain model. Proper lighting can highlight elevation changes and surface details. Add a sunlight or point light to your scene and adjust its angle to create contrasting shadows between peaks and valleys.
Additionally, using HDRI (High Dynamic Range Imaging) maps for environmental lighting is another great way to enhance the scene’s realism. HDRI maps provide comprehensive lighting and natural environmental colors. For a vivid background, you can download high-quality HDRI resources from Relebook to make your scene stand out.
Rendering and Post-Processing
Once modeling and lighting are set, you can start rendering your terrain model. It’s recommended to use Blender’s Cycles rendering engine for more realistic light effects. Ensure that the sampling rate in the render settings is high enough to reduce noise and improve image quality.
After rendering, you can perform post-processing to further enhance the model. Adjusting color, contrast, and lighting effects can make the terrain model stand out. In Blender’s compositor, you can add depth of field effects or color grading to increase visual impact.
Creating a 3D model of landforms requires time and skill, but mastering the basics will enable you to produce impressive results. From basic modeling to material and texture application, and finally to rendering and post-processing, each step enhances the realism and aesthetics of your terrain model. Whether for game scenes, architectural design, or virtual reality projects, these techniques will help you quickly create outstanding terrain models.
If you need high-quality 3D textures and HDRIs for your models and virtual scenes, download them for free from [Relebook](https://textures.relebook.com/). For beautiful 3D models, visit [Relebook](https://3dmodels.relebook.com/), where you can find a wealth of premium 3D resources. I hope these resources and tips help you get started and create more remarkable terrain models.
