How to Apply 3D Texture in Maya?
Preparing Your Model
Before you can apply textures in Maya, it’s essential to ensure that your 3D model is properly prepared. A well-prepared model makes the texturing process smoother and more effective.
1. Checking Your Model's Geometry
Start by examining your model’s geometry. Ensure that your mesh is clean, with no unnecessary vertices, edges, or faces. Non-manifold geometry, n-gons (faces with more than four sides), and overlapping UVs can cause issues during the texturing process, leading to distorted textures.
2. UV Mapping
UV mapping is the process of projecting your 3D model's surface onto a 2D plane, which allows you to apply textures accurately. Maya provides several tools for UV mapping:
- Automatic Mapping: Ideal for simple models, Maya automatically lays out UVs on a 2D grid. However, it might not always produce the best results for complex models.
- Planar Mapping: Projects UVs based on a specific axis, suitable for flat surfaces.
- Cylindrical Mapping: Best for cylindrical shapes, like pipes or arms.
- Spherical Mapping: Ideal for spherical objects like balls or heads.
- Manual UV Layout: For more control, you can manually adjust the UVs using the UV Editor.
After laying out your UVs, use the "UV Editor" to refine the placement, scale, and rotation of your UV shells to ensure the texture will be applied correctly.
Applying Textures in Maya
Once your model’s geometry and UVs are prepared, you can proceed to apply textures in Maya. The texturing process involves creating and assigning materials, and then applying and adjusting textures to achieve the desired look.
1. Creating and Assigning Materials
In Maya, materials define how the surface of your 3D model interacts with light. To apply a texture, you first need to create a material and assign it to your model:
- Open the Hypershade: Go to Windows > Rendering Editors > Hypershade. The Hypershade window allows you to create, edit, and manage materials and textures.
- Create a Material: In the Hypershade, click on the "Create" tab and choose a material type. The most common material types for texturing are:
- Lambert: A non-reflective, matte surface, good for rough surfaces like walls or cloth.
- Blinn: A material with specular highlights, suitable for shiny surfaces like metal or plastic.
- Phong: Similar to Blinn but with sharper highlights, ideal for polished surfaces.
- Assign the Material: Select your model in the viewport, right-click on the material in the Hypershade, and choose "Assign Material to Selection."
2. Adding a Texture
With the material assigned, you can now add a texture:
Apply the Texture: In the Hypershade, with your material selected, go to the "Attribute Editor." Under the material’s attributes, look for the "Color" section (or "Diffuse" for some materials) and click the checkerboard icon next to it. This will open the "Create Render Node" window.
Choose a Texture File: In the "Create Render Node" window, choose "File" to use an image file as your texture. This will automatically create a "File" node linked to the material.
Select Your Texture Image: In the "File" node attributes, click the folder icon next to the "Image Name" field and browse to select your texture image.
3. Adjusting Texture Placement
Once the texture is applied, you may need to adjust its placement to fit your model correctly:
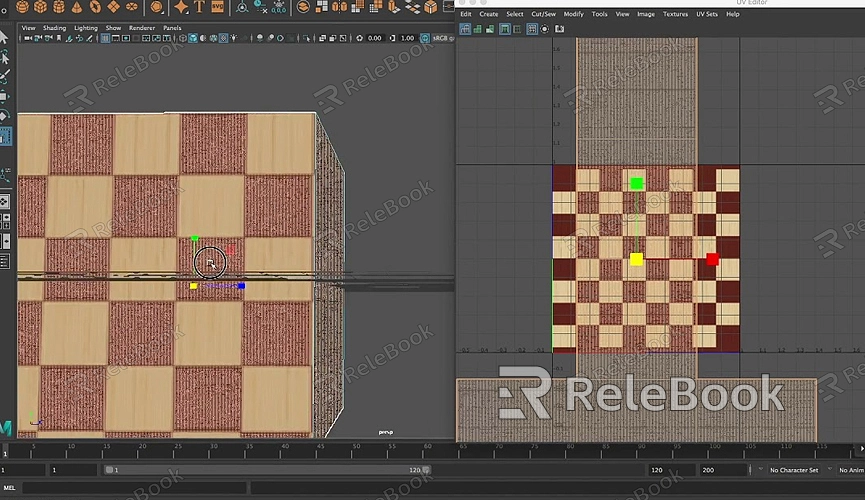
- Use the UV Editor: Go to the UV Editor to see how your texture is mapped onto your model. You can adjust the UVs here to fix any stretching or distortion.
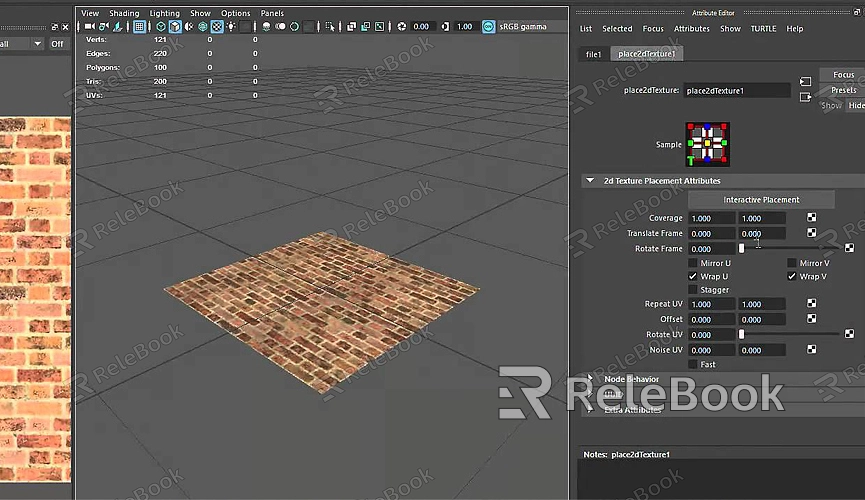
- Tiling and Offset: In the Attribute Editor, under the "Place2DTexture" node (automatically created when you applied the texture), you can adjust the "Repeat UV" values to tile your texture across the surface or the "Offset" values to shift the texture’s position.
- Previewing Your Texture: To see how the texture looks in real-time, press "6" on your keyboard to switch to Textured mode in the viewport. You can also render a preview using the Arnold or other render engines supported by Maya.
Refining the Texture
After applying the texture, you may need to refine it to achieve the desired look. This involves fine-tuning the material properties, adding additional maps, and testing different render settings.
1. Adjusting Material Properties
In the Attribute Editor, you can modify various properties of the material, such as:
- Specularity: Controls the shininess of the material. For example, increasing specularity makes a material look more reflective.
- Bump Mapping: Adds a 3D effect by simulating surface details like bumps or scratches without changing the actual geometry. You can apply a grayscale texture map to the Bump Map attribute.
- Transparency: Adjusts the material’s opacity. Use this to create effects like glass or translucent materials.
2. Adding Additional Maps
You can enhance the realism of your textures by adding additional maps, such as:
- Normal Maps: Similar to bump maps but provide more detail by simulating the lighting of bumps and dents.
- Specular Maps: Define the specular highlights, controlling which parts of the texture appear shiny.
- Displacement Maps: Unlike bump or normal maps, displacement maps physically alter the geometry of the model based on the texture.
3. Rendering and Testing
Finally, render your scene to see how the textures appear under different lighting conditions. Adjust the texture settings, UVs, or material properties as needed. It’s important to test your textures at different angles and with different lighting setups to ensure they look good in all scenarios.
FAQ
What is the best file format for textures in Maya?
Commonly used formats include JPEG, PNG, and TIFF. PNG is preferred for textures with transparency, while TIFF is used for high-quality, lossless textures.
How can I fix texture stretching in Maya?
Texture stretching usually occurs due to improper UV mapping. Use the UV Editor to adjust the UVs, ensuring they are evenly distributed across the model's surface.
Can I apply multiple textures to a single object in Maya?
Yes, you can apply multiple textures to different parts of an object by using different materials assigned to selected faces of the model.
What is the difference between bump maps and normal maps?
Bump maps create the illusion of depth by altering the surface normals of a model, while normal maps provide more detail by affecting the way light interacts with the surface, offering a more realistic effect.
How can I improve the quality of my texture renders in Maya?
Improve the quality by using high-resolution textures, refining UV maps, adjusting material settings, and experimenting with different rendering settings, such as increasing the sampling rate and using global illumination.
